If you have a food blog, chances are that your pages are filled with big, beautiful photographs. Which is great! What’s not so great is that high-resolution images have large file sizes and can slow down your website’s load speed. Slow page loading is not only an undesirable experience for your end user (the reader), but is also suspected to be taken into account by Google when ordering your blog within search results. But ultimately, having the best possible content is paramount, so I’m going to show you what I personally do to resize, compress, and lazy-load (don’t worry; I’ll explain what all of these things mean!) my images in order to get the best of both worlds.
All of the tools that I personally use to optimize my images are totally free. So you don’t need to be a big-budget, professional blogger to follow my instructions. The methods that I use are not the only ones out there, nor do I assert that they are the best, but I am simply explaining to you my simple routine that has served me well for a couple of years.
If you’re new to this whole topic, I suggest starting by getting comfortable with the idea and workflow of resizing your images, and then proceed to image compression, and finally implementing lazy loading. I’ve organized this discussion in that exact order. Blogging is all about baby steps and making small progress each day. Good luck!
Level 1: Resize your images
The problem
In the early days of this blog, my workflow was a little something like this:
- Take a picture with my camera
- Upload the picture from my camera to my computer
- Upload the picture from my computer to a blog post
- Go into the WordPress image display options and choose the image size that I wanted
What’s wrong with this picture? To explain to you why this workflow is a mistake, I’ll give you an example from my blog. Check out this old post of mine about 2-cheese vegan lasagna. (And let’s say nothing of the various other issues with that ancient blog post). Look at the first picture. Well, after it finally loads, that is. Here’s what you just saw happen:

- My photograph, with dimensions 1024 x 893 pixels, was added to my website’s WordPress media library
- The blog post loads the photograph within it, at a custom size of 594 x 517 pixels. But the image that it points to is still the larger image. The entire full-size image has to be loaded, and then resized, before displaying it in the post.
- Here’s the kicker: the original file size of the 1024 x 893 version was 152kb. (By the way, now that I’m using high-resolution images from my DSLR camera, versus the cell phone picture that was used in this old post, the original file sizes are more like 1 megabyte – almost 10 times as large – so this issue becomes even more severe if not addressed). If I resize the image on my computer and resave it as a smaller file, the file size is only 60.5kb. In other words, by having my website request and load the full-size file and resize it dynamically, I’m loading over 2.5 times as much data as I actually need to. If we’re talking about a food blog post with a half dozen images in it, this discrepancy is, in my opinion, pretty egregious.
The bottom line? The more total file size your page needs to load, the longer it will take. Plain and simple. So don’t ask your page to unload a completely unnecessary amount of data!
My solution
Luckily, this problem is not difficult to solve. You just need to resize your photographs before uploading them to WordPress (or whatever blogging framework you use). There are tons of tools available for this.
I don’t like frills, so I use the simple and free Image Resizer for Windows. You can download the Image Resizer for Windows here. The image resizer is super easy to use and can be accessed directly from your Windows file browser. Once you have it installed, your workflow will look a little something like this:
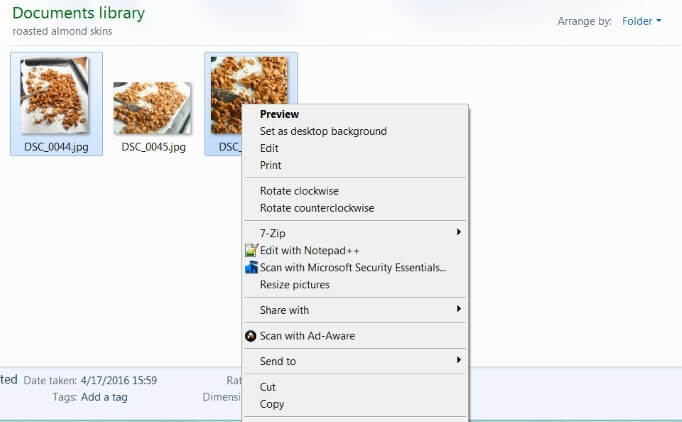
I right-click an image (or select multiple images for batch resizing, and then right-click; this will apply the same transformation to all of them) and select the ‘Resize pictures’ option that now appears in the dropdown menu.
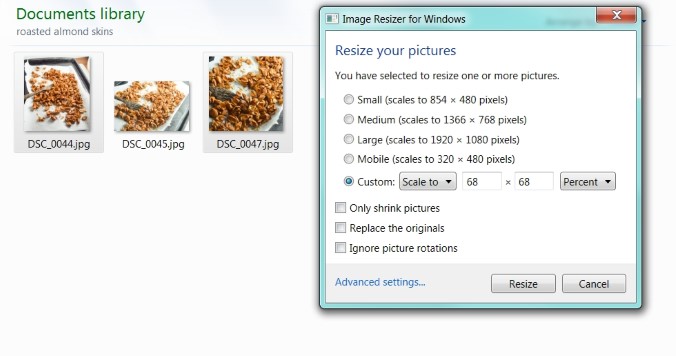
I choose the options that I want within the utility. Currently, I export photographs from Lightroom (a topic for another post!) at a width of 1000 pixels. But images with a width of 680 pixels look the best with the WordPress theme that I use. I choose to resize the images by percentage – 68% by 68%, which preserves the appropriate width-to-height ratio of the photograph. Not all of my photos have the exact same height which is why I use percentages for batch editing.
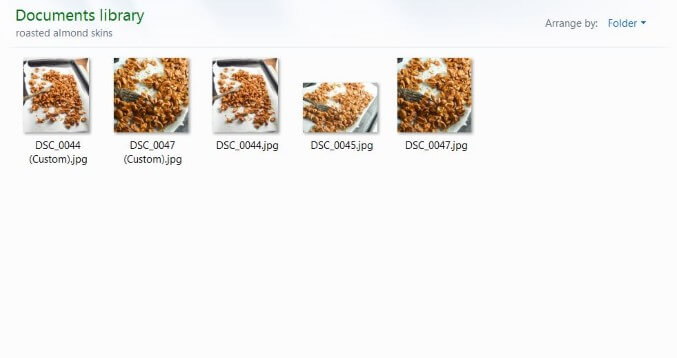
And now the resized images are saved in the same folder with ‘Custom’ names to demarcate them. I’ll rename those later :). The second of the two images I resized here went from an original size of 980kb to 219kb, meaning that the original image was almost 4.5 times as large. Wow! If someone’s internet speed is 1mb/second, I just saved them about 0.75 seconds of page load time on that image alone. Which in this impatient digital age, is quite a long time.
P.S. There’s a secondary benefit to be had here: less total file size being stored on your server, which potentially means that it will take longer for you to fill up the available memory and have to purchase an upgrade 🙂
Level 2: Compress your image files
The problem
So you’ve got the proper image sizing on lockdown, but your page is still a little slow. If you have 6-8 photographs in your blog post that are all around 200kb after resizing, that’s still well over a megabyte of images alone that needs to load. That’s ignoring the images you probably have in your sidebar (including advertisements, which you likely don’t have control over) and header. You might even have a blog background image that needs to load again and again on every page.
All of that adds up! But you’re a savvy blogger, and you’ve already (1) chosen the minimum number of images needed to illustrate your food and highlight your writing; and (2) uploaded them in the same dimensions at which they’ll be displayed, to reduce any image size waste. So it’s a little frustrating trying to figure out where else you can cut back. Thankfully, there’s more that can be done to reduce the total image data that needs to load, without changing what your readers see – whether that’s by making the pictures smaller, removing some of them, or making them lower quality.
Allow me to introduce you to lossless image compression. Each pixel of each of your photographs is made up of information that describes what’s contained in that pixel. And thanks to some mathematical mumbo jumbo that I’m absolutely not going to delve into, the contents of the overall image can be perfectly reconstructed with fewer total pieces of information. On a physical level, the information used to construct an image needs to be stored in memory, so if you can use mathematical tricks to represent the same image with less information, then you can reduce the file size.
My solution
So listen, I’m a mathematician for a living, and I certainly don’t do this image compression math myself, or even 100% understand it. Thankfully we don’t have to. There are tons of awesome tools available to losslessly compress images for us.
My tool of choice is a website called Kraken Image Optimizer. Kraken offers paid plans that unlock additional features; you could actually do your image compression and resizing step in one fell swoop using their paid plan; I resize mine separately because I’m stingy. But the core product, a web interface for uploading and compressing images, is totally free. You can access the Kraken Optimizer here. It’s super easy to use; here’s my workflow.

I have all of the resized photos for a blog post ready to go in a folder, and I select them all and simply drag and drop to the box on the screen. Make sure to select ‘Lossless’ for your compression type before proceeding. The default is ‘Lossy’, and while the lossily-compressed images still look pretty good, you’re a food blogger and your pictures are your content’s biggest selling point, so I think personally it’s important to make them as crisp and high-resolution as possible.

Once the images are done being compressed they pop up in the box at the bottom of the screen and you can right-click the ‘Download file’ button to save them back to the same folder (I give them a new name again). That’s really all there is to it! These photos are now ready to be uploaded to your blog post. As you can see, I saved another 67kb and 82kb, respectively, on these two images. 6 to 8 photographs ought to save you at least another 360kb total of data size, so if we round up, that’s another half-second that you’ve knocked off of the page load time for someone with 1mb/s internet speed. Cool!
Level 3: Implement lazy loading
The problem
Okay, so you’ve resized your images. You’ve compressed them, too. But with all of the (awesome and helpful!) WordPress plugins you use, your advertisement services, and the pictures themselves, there’s still a bit of a hangup when trying to load the website.
We’ve all been there. And by that I mean, I’ve been there. I found myself struggling to accept that my blog was loading slowly because it was waiting to retrieve images that weren’t even in view of the reader. Especially the bio pictures and post thumbnails in my website’s footer – they’re great, but the entire point of them is for you to see them when you get to the bottom of a post; they’re mostly duplicate content to what’s in header or sidebar. At the same time, I noticed that the viewability rating (the proportion of the time that an advertisement is actually in the reader’s view) for some of my ads was relatively low, and affecting my advertisement revenue.
I thought about this conundrum for a while. And finally I had that “light bulb” moment where I realized: why not load the images when the reader is actually going to see them, instead of loading them all at once? Why hasn’t anyone thought of this?
My solution
Spoiler alert: people have thought of this. It took me some time to come around on the concept of lazy loading, and by the time I did, there were already several awesome FREE WordPress plugins that will automatically do it for you.
The plugin that I have settled on using is called a3 Lazy Load and I’m very satisfied with it. (See… the authors of the plugin agree with me: “Images are the number one element that slows page load and increases bandwidth use”). All you have to do is install the plugin normally in your WordPress admin plugin area, and then activate it. There are plenty of options for customizing the plugin once you do activate it.
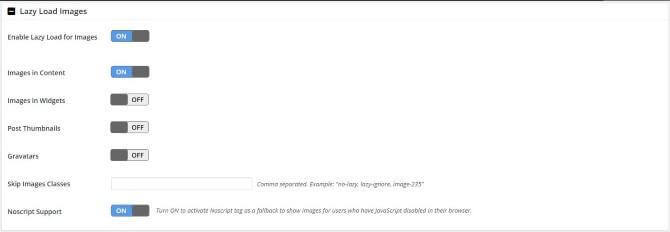
I mostly go with the default options.
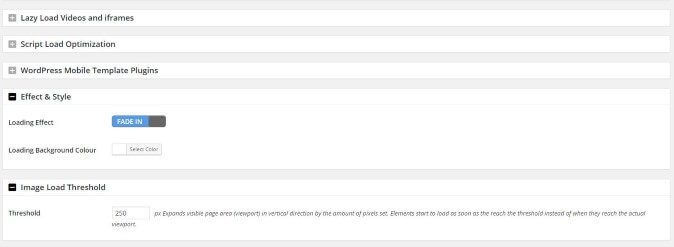
In my opinion the lazy loading looks best with the fade-in option (the other choice is “spinner”). I use their default background color of white, because my blog also has a white background. If yours doesn’t, you might want to consider matching up the colors for aesthetic purposes. How this works is that the plugin puts a placeholder box that’s the same size as the image, and only loads the actual image once you scroll close to it (in the case of my chosen settings, it loads once the in-view content gets within 250 pixels close to the image). This allows more resources to be devoted to loading your site header, etc., and the first image in your blog post, right when the reader reaches your page; and only loads the additional images on demand.
I’m not sure if I did a very good job of explaining any of that, so you might have to just trust me that lazy loading of images can make your website faster and more enjoyable to use. I spent about half an hour trying to make a short screenshare to show you what the lazy loading looks like to your average website visitor, but, technical difficulties. However, if you poke around my blog posts you just might notice it happening!
Well, that’s all I’ve got for optimizing your images and image loading to speed up your site. I would take the stance that levels 1 and 2 of this guide are essential for having a beautiful, effective, photo-laden website; and level 3 is a nice complement. Hopefully you found this helpful! Questions? Comments?

 I'm Shannon, the writer and photographer of Yup, it's Vegan! I'm a morning person based in Baltimore, USA. My mission is to create healthy plant-based recipes that anyone would enjoy, using seasonal produce with inspiration from global flavors.


James says
tell me in simple words, how much image size (in kb) I should consider for my blog , and dimensions wrt to image size ?
Michael says
Awesome! Just what I was looking for to increase the page speed of my sites. I use Kraken(used to have wp smush) at the moment, but I needed something in combination to make my website open up faster. I kept have off-screen deferred images and others so this will help lazy-load my images and overall site,
Thank you.