If you’re trying to move past the stage of hobby blogging and add some purposeful growth to your readership, chances are that you’ve noticed there are a lot of things to keep track of day-to-day, and many recurring tasks. There are lots of ways of dealing with this, ranging from attempting to remember everything in your head, to complicated to-do list apps. I fall somewhere in the middle. I maintain a series of Microsoft Excel spreadsheets and a couple of other lists.
Note: if I didn’t already have an old copy of Excel, I would do the free thing and use Google Sheets instead, which would have the added benefit of being available from any device where you can log in your Google account. There was a point in time where I was working on the blog from multiple devices, and I used Dropbox to store files that needed to be shared. I now, with the exception of really basic things like responding to comments, do all of my website work on my home PC and don’t need to bother with file sharing anymore.
In this article I’ll give you a brief tour of the different tracking spreadsheets that I use, and why.
Gallery website submissions
One of the first things most bloggers will tell you in their food blogging resource sections is that you should submit your recipes to a variety of photography gallery websites (think Foodgawker).
What they don’t tell you is that going through a list of websites and submitting all of your recipes is tedious and error-prone – to say nothing of the fact that sometimes your photos aren’t accepted the first time around and you have to resubmit. So I keep track of all of that in a big matrix of all of my posts which I store in a spreadsheet.
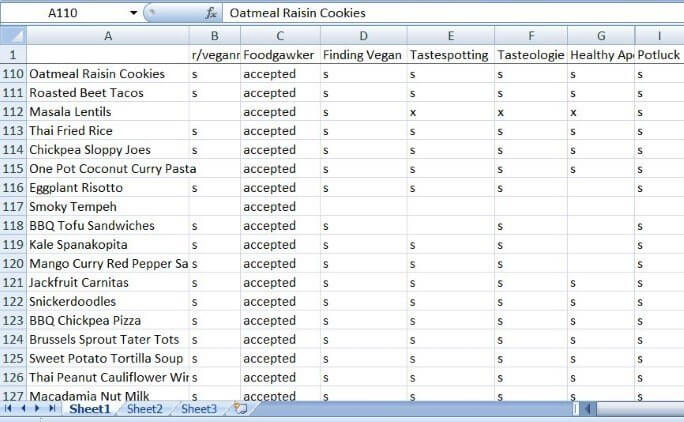
You can see I simply have a row for every pertinent blog post and a column for everywhere I’d like to submit it. You’ll notice column ‘H’ is hidden. That’s because column ‘H’ is for Yeastspotting, which is a gallery of only (you guessed it) recipes that use yeast. Frankly I just don’t make much bread anymore and haven’t posted a yeast-based recipe in a long time, so I hid (rather than deleted) this column to remove some visual clutter.
I have deleted columns in the past. Every few months, I review my referral traffic in my website statistics and look at how many referrals I received from each of these websites. It’s a holistic decision, based on other benefits the website may also provide (e.g. for Healthy Aperture, by participating I also gain access to sponsored post opportunities); but if a website isn’t sending me traffic, I don’t spend time submitting my photographs to them.
P.S. I’ll tell you why I neglected to submit that smoky tempeh recipe to so many sites… I was so far behind on blog-related work last fall that I didn’t get around to submitting recipes until summer produce was completely gone for the year, and I thought it made little sense to promote a recipe calling for fresh tomatoes and peaches in November. 😐
I store a few other things on this same spreadsheet, to take advantage of the fact that it’s already listing all of my blog posts.

Here I’ve hidden the submission columns from the previous screenshot to show you the rest of the columns that I maintain. I use this like a simple yes/no checkbox to confirm that I:
- Created a multi-image Pinterest graphic for that recipe (I don’t include these in my actual blog post usually, so they don’t have to be done before the post goes live)
- Corrected/updated the recipe’s categories and tags. This is something that I had to go back in time and do for most of my old blog posts. For my first ~18 months of blogging I wasn’t using a consistent system, but I recently decided I wanted people to be able to actually fully use my tag and category system, so enter the manual labor of fixing old posts. I am almost done doing this for every recipe and then I can nix this column!
- Converted the recipe to an EasyRecipe. About a year ago I changed the recipe plugin I use, from ZipList to EasyRecipe, and to be consistent, I went back and converted old ZipList recipes. I’m almost done doing this too!
- Added my own ‘Yum’ to the post, for Yummly. Yummly is a growing social network that’s a bit like Pinterest, but specifically for recipes. Once I got my blog setup with Yummly, I went back and ‘yum’med all of my old recipes to make sure they got onto the site.
Finally, the last column is one that I use inconsistently, depending on whether I complete all of the relevant website submissions/pin creations in one sitting. But if I need to come back later and anticipate having to write a short blurb about a recipe again, I just copy/paste it into this spreadsheet for posterity, so that I don’t have to try to be creative again.
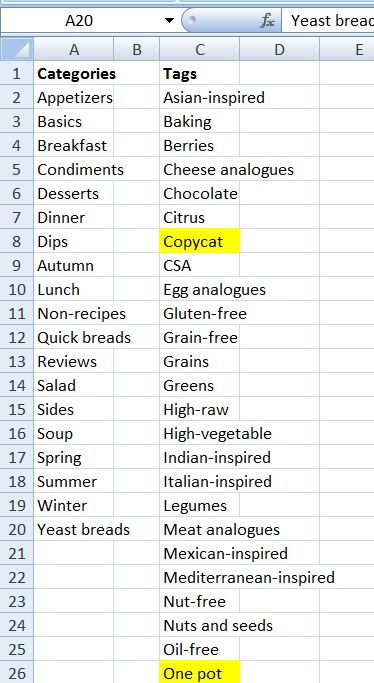
Lists of categories and tags
This one is pretty simple: I use a document to list out all of the categories and tags that I actively use. I cross-check this list before publishing a new post, to make sure I didn’t a) use categories and tags that don’t actually exist in the schema I decided on and b) add the recipe to all of the ones it’s eligible for.
Advertisements, referral links, and sponsors
This next spreadsheet is a catch-all spreadsheet for several things relating to monetization. I haven’t been using this spreadsheet for as long as the other ones, but it’s been pretty helpful so far. I’m being vulnerable here, so please let’s keep this a safe space! 😀
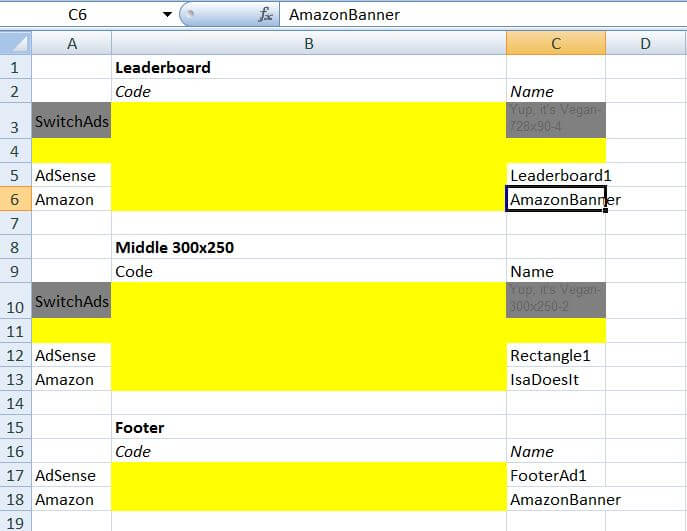
This first tab gives me a specific overview of how I’ve set up my advertisement waterfall. As I discussed in my May 2016 income report, I actually have all of my ads managed through AdThrive now, but because not everyone is able to use AdThrive, I thought it would still be useful to go over this with you.
Here’s the basic concept behind an advertisement waterfall: Suppose you use an ad network that gets great revenue per 1,000 visitors, but has a poor fill rate, meaning that oftentimes it doesn’t display an ad at all (which doesn’t factor in to that revenue metrics). You’re probably also a part of Google AdSense, which has an almost 100% fill rate. What you can do is setup the first ad network so that if they don’t have an ad to display, they’ll defer to your Google AdSense ad as backup. This is called a ‘passback’. The result is that you get the best of both worlds: high revenue and high fill. I’m working on a longer article where I go into the mathematics and mechanics of this in a lot more detail.
Each section of this tab represents one of my ad slots, and then from top to bottom within that, I show the ordering of my advertisement waterfall. There used to also be Sovrn ads in-between SwitchAds and AdSense, but Sovrn stopped performing well for me and I removed it from my setup. The ‘Name’ column refers to the name of that specific ad unit within the corresponding ad provider. If I went into my Google AdSense account and looked at the ads I have created with them, the name ‘Leaderboard1’ tells me which one I need to be dealing with. This is useful because if I ever change the ordering of my waterfall, I need to get the specific ad’s code to feed it to a different network as a passback. So maintaining a record of the current ordering takes out any guesswork or extra research needed when making a change.
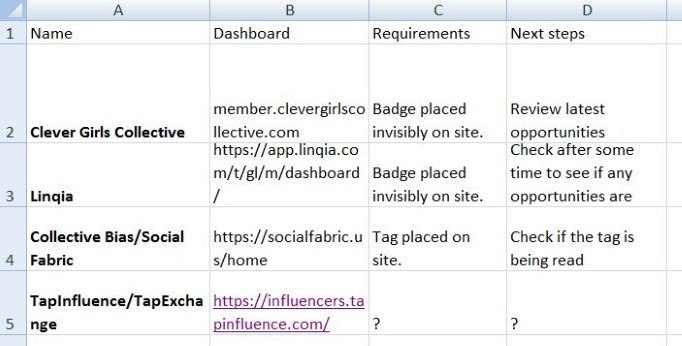
This next tab tracks the sponsorship networks that I participate in. You’ve probably noticed there are hardly ever sponsored posts on my blog. That’s not for a lack of trying. I definitely want to do more sponsored posts to increase my earnings, but I’m also insanely picky about them, because I don’t want a sponsored post to result in me sharing a recipe I wouldn’t share anyway. I believe it’s important to maintain my integrity in that sense. Anyway, in an effort to widen my net, I joined a few sponsorship networks that attempt to connect bloggers with sponsors.
In this spreadsheet I simply keep a link to the dashboard (where ostensibly I can go to check out new opportunities that are available); a ‘requirements’ column where I (try to) confirm that I’ve done any needed steps to be eligible for that network’s opportunities; and a ‘next steps’ column that reminds me where I left off last time and what I should do next. Pretty simple.
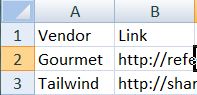
I can’t show you the entirety of this last tab, for… reasons; but this is where I maintain a list of all of my personalized referral links to various vendors that I support. These are basically Amazon-affiliates-for-things-that-are-not-Amazon, i.e., if someone clicked my Gourmet Ads link and ended up signing up with Gourmet Ads (which I recommend – they were my best network before I switched to AdThrive), I would get a small commission. So if I’m going to be mentioning Gourmet Ads in various places on my site, I ought to use the referral link instead of just linking to the Gourmet Ads main page; but I don’t want to have to look it up every time, so I store it in this list. Easy peasy.
Pinterest pins
I use a service called Tailwind to schedule out different pins of my recipes to various boards. I do this so that I can space them out throughout the day without having to actually be at my computer pinning them. To stay organized, I maintain a (private) Pinterest board that consists only of 1 copy of each of my custom recipe pins. I then created a new spreadsheet that lists all of the pins in the same order in which they appear on the board, adding new rows to the top as I create new pins.
![]()
The ‘h7’, ‘h8’, etc. column names don’t really mean anything. They just allow me to track the last few times that I added pins to Tailwind. I add around a dozen new recipes at a time, spaced out with pins on several different boards, and then shuffle them randomly. Once those have all been pinned and it’s time to refill my Tailwind queue, I choose a new set of recipes to add to the queue. My choices might depend on the season, or any upcoming holidays, but most importantly, tracking my selections in the spreadsheets allows me to make sure that I don’t spam the same recipes over and over. And I can also see if there are any recipes that haven’t had some love in a long time. If I included a specific recipe in a group, I just type an ‘h’ or ‘h8’ or something like that into the appropriate row/column.
You can see that there are a bunch of hidden columns, those are the old ‘h1’, ‘h2’, and so forth. I find it most informative to look at the most recent few groups of recipes, but I still retain all of that historical information.
Income, revenue, and expenses
The last (and arguably the most helpful!) main spreadsheet that I use is a multi-tab workbook for tracking my blog’s revenue, tracking when I actually receive payments of said revenue (since this is what matters more for taxes), and tracking any blog-related expenses. I’ll walk you through the different tabs. And the same disclaimer applies as it did to the previous section of this article: I’m being vulnerable here, so please be considerate with this information.
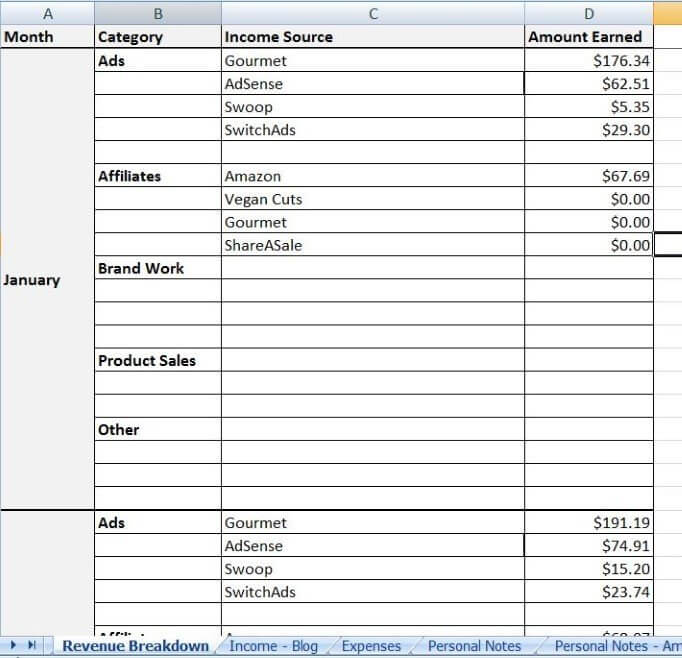
This tab is where, after a month ends, I enter the final revenue totals for each individual advertisement and affiliate vendor that I use. If I have any sponsored content or miscellaneous income that month, I store it here, too. This is a useful tool for looking at each network’s earnings over time. For example, it’s what helped me to realize that my Sovrn earnings were in a downward slide and that I should move it further down in my waterfall. Plus, it just feels good to see these numbers grow (in the long run)! I’m showing you my REAL numbers from January 2016 here. I don’t mind sharing, since I recently started doing income reports anyway!
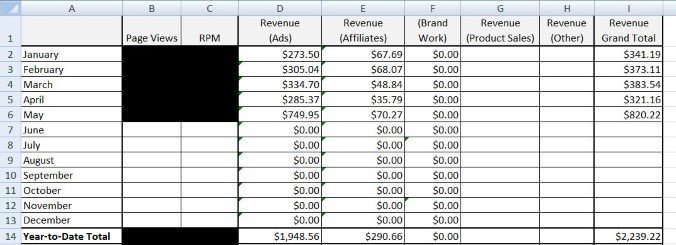
This tab (sorry, I have to block out my exact traffic numbers) has formulas in the cells to total up the information from the revenue totals tab and summarize it. This provides a convenient way to look at my monthly and year-to-date revenue.
This next tab is super important because it helps me with my year-end taxes. The following information comes with a big fat disclaimer: I am not a tax professional and I am not liable for any decisions, failures, or successes of yours resulting from reading the information below. I am merely offering some insight based on my experience with blog income and taxes thus far. If there is interest, I may publish a longer article in the future about managing blog finances.
Remember that you DO need to report and pay taxes on all of your blogging income, unless it totals less than $600 for the entire year (and that $600 limit also includes any other non-W2 income sources you might have). I have a part-time job, in addition to my full-time job, which pays me on a 1099. So I’m no stranger to complicated taxes, and trust me, it’s just a lot easier to gather your information into one place as the year progresses. Also, depending on the amount of income you have, and whether taxes have already been withheld from it (with almost all blog-related income, they are NOT withheld), you may need to make quarterly tax payments to the IRS. So stay on top of your sh*t, please.
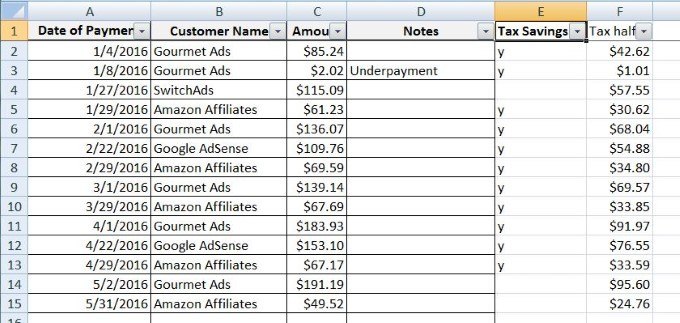
Every single time I receive a payment from any blog income source, I log it in this spreadsheet and put half of it into a separate bank account that I opened, specifically for storing money that is set aside for taxes. There’s no rule that led me to choose to save half of it. I just prefer to be cautious. You can see that for some reason, there are a couple of older payments that I haven’t saved half of into that account yet. I need to take care of that :). I don’t use this Notes field much, only to delineate if a nonstandard payment is received (like a revenue correction payment that I received from Gourmet Ads).
It’s important to track the actual income separately from the monthly revenue, because the taxes owed on income will depend on the year you actually receive it. Some of the payments listed on this tab are for revenue that was actually earned in late 2015, but I received the payment in 2016 and thus it will fall under 2016 for tax purposes.
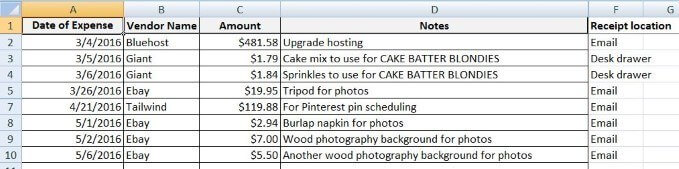
Similarly, I track every blog-related expense that I pay, because those expenses are tax-deductible. That doesn’t mean if you buy something for the blog that costs $X, your taxes owed are reduced by $X. Your taxable income is what is reduced by $X, so the net result is that you basically get the item at a ~30% discount – or another way of thinking about it is that you’re just cutting into your own (taxed) profits.
You can see that I make note of the exact date of the expense, where I bought it, and what the amount was. I write a note about what the good or service will be used for, and most importantly, I remind myself where I have stored the receipt. If I ever get audited, I will not be able to prove that I had these expenses, unless I provide the receipt. So I’m super super careful about this. When in doubt, I just don’t deduct an expense at all. Please note: a common myth is that food bloggers can deduct all of their grocery bills from taxes. That is SO not how it works. I only deduct specific ingredients as an expense if I bought them only for the purpose of styling the photographs. Think herb garnishes, sprinkles, etc. Even then, I’m not super meticulous about tracking those costs, because they’re generally very low. It’s up to you. I eat everything I make for the blog, so legally it cannot count as a business expense, since it’s serving the personal purpose of feeding me. Please consult a tax professional if you’re unsure on where to draw the line.
So there you have it… my small army of spreadsheets that make my blogging life easier! Do you have any other suggested methods for tracking all of this information? Questions?

 I'm Shannon, the writer and photographer of Yup, it's Vegan! I'm a morning person based in Baltimore, USA. My mission is to create healthy plant-based recipes that anyone would enjoy, using seasonal produce with inspiration from global flavors.